On Friday, April 1 Ruth and I walked into an antique shop in Caledonia, New York, and I was almost immediately drawn to a colorful item sitting on one of the tables; it was a very nice rope snare drum. The shop’s proprietor told me that it was brought into the shop by a Civil War reenactor from the nearby Genesee Country Village, which hosts a popular reenactment event each year.
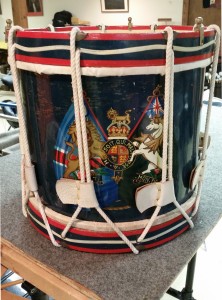
Restored Brass Shell Rope Drum
Upon inspection, I noticed that the drum was in pretty good shape. The only damage was a calfskin batter head that had a tear along the rim with a flesh hoop twisted beyond repair. The brass shell was in very good condition with a beautiful hand-painted insignia – the Royal Arms of King George II – indicating that the drum was likely made in Canada by Whaley, Royce & Co., Ltd. in Toronto. (The Whaley, Royce Co. was founded in 1888 and closed in 1969.) The calfskin snare head and the snares were also in good working order. The colorful counter hoops were perfectly round, and the ropes were clean and like new.
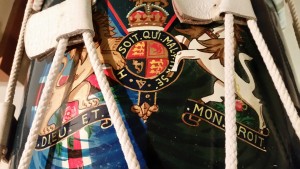
Closeup of the Rope Drum Insignia – the Royal Arms of King George II.
After considering the effort that it would take to remove the existing batter head and replace it with a new calfskin head, I came to a decision to walk away. But then I noticed the price, $65.00, and I knew right at that point that I would buy the drum. After I asked the dealer if $65 was the best price, we settled on a price of $60.00 – SUCH A DEAL!
At home the drum then sat unattended for a few days until I could find enough time to start the repair.
The first step was to loosen the ropes, after un-braiding the tug line. By gradually working the rope backwards from the tug line – but not unlacing the rope from any part of the counter hoops – it was eventually possible to work the top counter hoop off of the top head so that the head could be removed.
Fortunately (or so I thought at first) I had a small stock of pre-tucked calfskin batter heads, which had been sitting on a shelf in the basement for at least 25-years (or longer). I thought that all I would have to do was to put on one of my pre-tucked heads, slide the counter hoop back into position, tighten the ropes, re-braid the tug line, and voila, I’d be ready to dive into flams, ruffs and paradiddles.
However, when I tried to fit each and every one of my 14-inch pre-tucked heads onto the brass shell, none would fit; they were all about 1/8th-inch too small in diameter.
So plan ‘B’ would be that I’d either have to buy a new head or else tuck a new head myself. Fortunately (or so I thought) I also had a small stock of untucked calfskin batter heads that had also been in the basement for as long as the pre-tucked ones, and I also had a small supply of 14-inch flesh hoops (wooden hoops about 1/4 –inch wide on each side, around which the skin head would have to be tucked). That was the good news. The bad news was that I needed to find a flesh hoop that was 14+1/8th-inches in diameter, and no such counter hoop was to be found in my basement
So plan “B” (subsection “1”) would be to see if I could buy either a pre-tucked head or a 14+1/8th-inch diameter flesh hoop. I telephoned the Cooperman Fife and Drum Company in Vermont, and I was informed that it would be possible, but fairly expensive (much more than I paid for the drum), to have a pre-tucked head custom made.
I was also informed that it was possible to buy an inexpensive unglued flesh hoop – one that is open-ended so that it could be fitted onto the brass shell and then glued. So plan “B” (subsection “2”) would be that I’d buy an untucked, unglued flesh hoop ($7.75 plus postage), glue the hoop ends together on the brass shell myself (after allowing for the thickness of the skin head), then tuck one of my untucked calfskin batter heads around the flesh hoop, place the tucked head onto the brass shell, slide the top counter hoop back into position, tighten the ropes, re-braid the tug line, and voila, I’d be ready to roll (pun intended). This is finally what I decided to do.
The new flesh hoop arrived in the mail in a few days. With the flesh hoop fitted firmly in place on the brass shell (over thin cardboard spacers to allow for the thickness of the calfskin) I drilled a thin hole through the overlapping unglued ends of the flesh hoop. Then with the flesh hoop removed from the shell, I glued the overlapping ends and drove a thin nail through the pre-drilled hole to precisely lock the flesh hoop at the proper place, and I finished the step by clamping the overlap near the nail until the wood glue dried a few hours later. Finally, both ends of the nail were hack sawed off and filed to be perfectly flush with the surfaces of the flesh hoop.
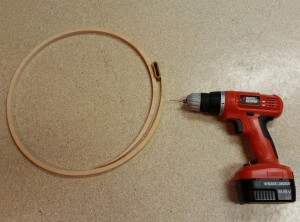
The unglued flesh hoop, showing where the hole was drilled for the stabilizing nail prior to gluing
It had been several decades since I last tucked a drum head, though on several occasions I had used torn calfskin bass drum heads to replace damaged tambourine heads, but there was no tucking involved; I had simply used large hose clamps to clamp those heads directly onto the tambourine shells. Fortunately, I was able to find my tucking tool that had also been buried in my basement for many years.
Instead of describing how I tucked the new batter head, I would suggest going online to an excellent posting on YouTube by Nick Bonaccio, who was a student of mine for one semester at the Eastman School. The posting is titled, “Tucking A Calfskin Snare Drum Head” and it can be found at – https://www.youtube.com/watch?v=M8GVltWsxbg
But prior to actually tucking the new batter head, it occurred to me that it could be problematic to re-tension the ropes after the new head was placed on the shell. In order to avoid having the tension on both drum heads being uneven and out of balance it would be very helpful to first be able to clamp the top and bottom counter hoops together evenly, so that the heads could be set evenly before the rope was tightened. With the counter hoops clamped into place evenly, the rope could more easily be tensioned all the way around the drum to conform to the clamped position.
So plan “B” (subsection “3”) would be to design and build a counter hoop clamp. After some amount of reflection, I went to a hardware store and purchased the following materials: an 8-ft. length of 2”x2” furring ($1.92), a 4-ft. length of threaded ¼-20 steel rod ($3.99), four ¼-20 wing nuts ($1.49), six flat washers ($.78), four ¼-20 acorn nuts, and two 2-inch ¼-20 bolts and nuts ($2.00).
The 4-ft. length of threaded ¼-20 steel rod was hack sawed into four lengths of 18-inches each. The 8-ft. length of 2”x2” furring was sawed into four lengths of 2-ft. each. In the center of each 2-ft. length a 1+3/4-inch by ¾-inch notch was cut so that two pairs could be bolted together into two crosses, with each arm having an overall even thickness of 1+3/4-inches. The next step was drilling the holes on the ends of all the cross arms to accept the four threaded rods, which would be held in place by the acorn nuts on the underside of the lower crossarms, and by the adjustable wing nuts on the top side of the upper crossarms.
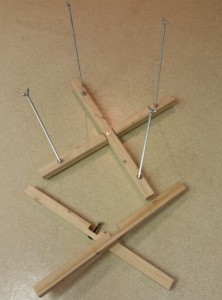
The finished counter hoop clamp with the upper crossarm disassembled (below)
With the clamping device now constructed, the drumhead was tucked and allowed to sit for about a half-hour. Then, while it was still wet, the tucked head was placed on the drum’s brass shell. The entire assembly (shell, heads, counter hoops, rope) was placed into the clamp (with the upper crossarm removed) so that the lower counter hoop rested on the lower crossarms. All of the rope and leather ears remained very loosely laced – back and forth between the lower and upper counterhoops. With a little bit of juggling, the upper counter hoop was worked back into place over the new head. At that point the upper crossarm was fitted onto the four rods, and the wing nuts were screwed on evenly. By gradually tightening the four wing nuts the heads were tensioned evenly, but not too tight to allow for the newly tucked head to dry overnight. To insure evenness, a yardstick was used to measure the space (about 14+1/4-inches) between the upper and lower crossarms at all four of the threaded rods.
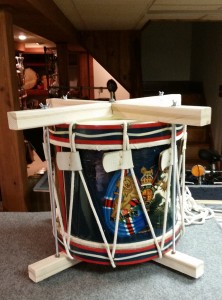
The drum positioned inside the counter hoop clamp
By the next morning the new head was dry and set. The wing nuts were evenly tightened on all four of the threaded rods until there was a good tone, still with enough slack in the heads to allow for the leather ears to add tension. With the counter hoops still clamped, the rope was gradually tightened around the drum so that there was no visible slack on the rope all around (with the leather ears in the slack position).
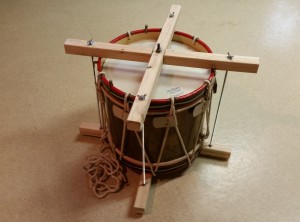
Another view of the drum inside the counter hoop clamp. (Notice that the leather ears are slackened.)
At that point the leather ears were brought to maximum tension, and then slackened after a few minutes. The rope now had some new visible slack, so the process of tightening the rope (with the leather ears in the slack position) was repeated.
Finally, with the rope tensioned evenly, and with the excess rope braided into a tug line, the clamp was removed and the drum was ready to play. The total cost for the drum was about $78.00, plus about 9-hours of work (plus the cost of the new head that had been in my basement for decades).
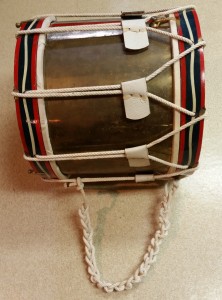
The restored rope drum with its braided tug line

NOT a Whaley Royce drum but a copy if the Guards Model side drum made in India! They have flooded the market the last 20 years with these inferior drums. ANY W-R drum will have Whaley-Royce makers Toronto Canada engraved around the sound hole.
Wonderful insight ! I just acquired a late 1860s English drum. Someone between then and now restored the drum using 14″ calf heads.(the true size is an odd 13.5ish).
After research, I found that Remo custom makes heads, I’m sending the drum to them for proper fit 50 bux a head with 50 bux shipping each way. The good news is that I can choose any one of the membranes they offer in regular sizes. I talked to a guy who is personally receiving it and Will start work right away. So that’s my story. To be continued.
Wow Bill! Great post on how to replace the drum head on such an interesting drum! I met you many years ago while I was a member of the C.A. Palmer F & D Corps. This goes back to the 80’s I believe. I’ve been living in Thailand the past 15 years and often thought of starting a drum corp here, but time was the problem. I hope all is well with you and keep up the great work in teaching and playing.
Happy rata tat tat!
John Guchone
Good idea for the clamp. May have to make one.